Web unit studio
Work to have done:
- A short blog post about possible group projects
- Work in pursuit of a final website
Plan for the day:
- Planting seeds
- Studio time
- Exit note
Today is all about working on your individual projects! Add and mark up content, adjust layout, watch relevant tutorials. I know your lives are busy; take advantage of this dedicated time free from other distractions and obligations to move your piece forward.
At the same time, it’s worth noting that you’re working in a shared space, in a studio. If you have questions, or you want feedback on something, you have your classmates and your instructor on-hand. Try not to monopolize anyone’s time, but do be open to the possibility of getting farther together than you could on your own.
As before, I’m going to ask you to write me a brief exit note in the last 5 minutes of class.
Seeds of ideas I want to plant:
Lowest line-count challenge.
In the HTML, consider whether you need all the <div>s you have, or whether you could put the relevant class directly on the element inside it. (It will depend on whether you need the container for flexbox or grid.)
In CSS, look for ways to consolidate rules to avoid repeating yourself. For example, any style you need to apply more than once should probably use a class selector that you can re-use several times in your HTML, rather than an id (which you can only use once).
Bear in mind that the cascading aspect of CSS means you can combine rules, so you can define a general class for (say) images and then add or override just one or two lines for a subclass:
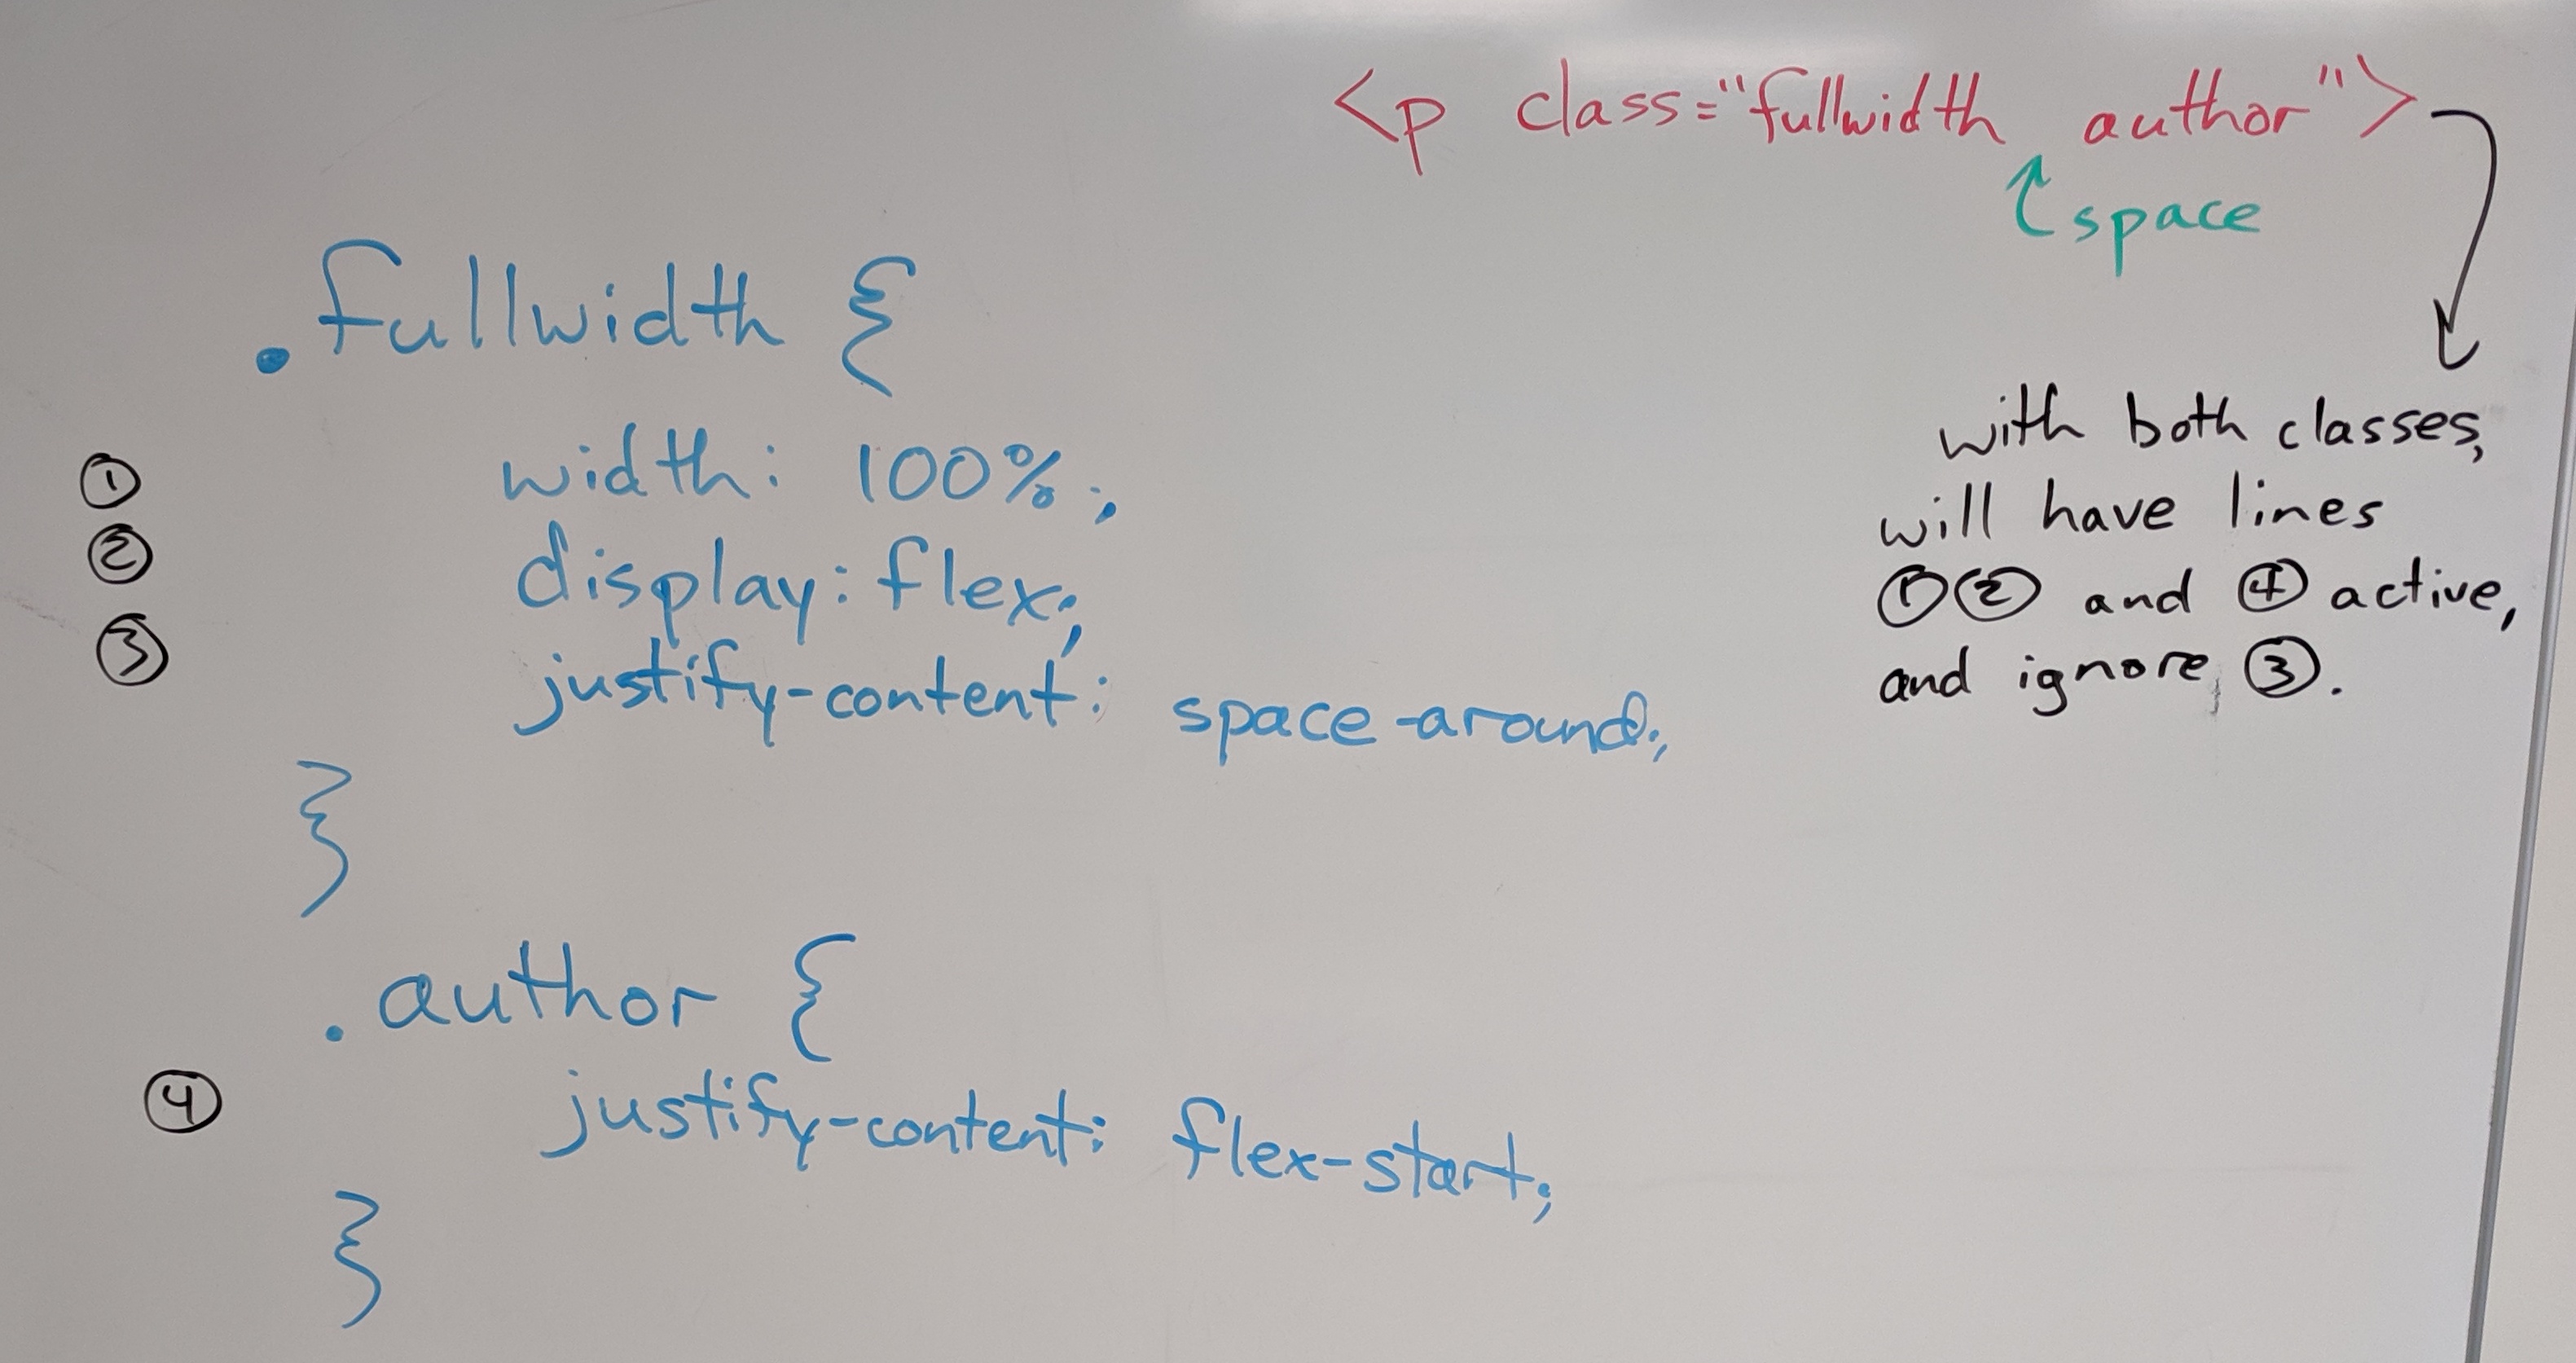
Rules at the same level of specificity will be applied in the order they appear in the CSS, so later rules override over earlier ones.
Aim for semanticity: structure in the HTML, display in the CSS.
If you have hard-coded display using HTML elements like <center>, <font>, or <b>, or if you have inline style set with the "style" attribute on individual elements, I encourage you to look for ways to do this instead with CSS. This is a matter of both flexibility and accessibility, and it makes it a lot easier to revise if you later decide to, say, change your color scheme: you just have to change one line in the CSS, rather than search for every explicit tag.
For some things, it even makes it easier to decide what you want: you can play with the CSS rules (and select colors!) directly in the browser's inspector, and then grab what you want. Firefox is especially user-friendly for this.
Consider leveling up on semantic HTML.
If you're drowning in "div soup," it may help you to know that HTML5 includes a number of elements that function in basically the same way, but are a lot easier to read: things like <header>, <section>, and <nav>.
Read all about semantic html in the Interneting is Hard tutorial!
Stuck on layout? Try CSS grid.
My Google News feed brought me a great article yesterday on Medium introducing the reader to CSS Grid. The latest CSS approach to layout, it's new enough that it's not in the "Interneting is Hard" tutorial, but old enough that it's now has almost universal browser support.
What I like about this particular tutorial – just a 7-minute read, the header helpfully informs me – is that it's embedded not only with images, but with short screen-capture GIFs that demonstrate in a very immediate way what happens to the layout when a new CSS rule is added.
Author Rafaela Ferro also does a great job of keeping the tone light by focusing on cute pictures of dogs. I also recommend her follow-up tutorial on using CSS Grid to create responsive layout – which is, she argues, even easier to do with Grid than with Flexbox (let alone Float).
Articulate permissions.
If you're using resources you didn't make yourself, be sure to include enough information to recover where it came from: a direct link to the image and to the specific license (if there is one) is ideal. Where to do this? Ideally, somewhere small under the image itself. (There's a semantic html way of doing this with <figure> and <figcaption>.) Alternately, you can have a rights page somewhere, or use the site footer – or link to an external CREDITS file in your repo.
NB: If an image is under copyright, you can still use it if you can make a good case that it's a Fair Use. See Writer/Designer page 156 to review the Four Factors you need to consider.
Consider titles.
A title can provide a context, a clue, a genre, a commentary; it can add an extra layer to viewer expectations. In previous units, you were titling your entire project; for a website, every page has its own<title> element in the <head>, which will show up in the browser's tab. These titles could be the same for all your pages, but they could also vary. What text do you want on top of the window, to show users where they are?
Don't forget to update your README.
It should have a brief description of the project, and may I also suggest an active link to your live website, if you have one?Okay, now go to!
- as a project file
- as a git commit, saying what you've just achieved
- as a screenshot
Quick report back
Before you leave, just as a way for me to check in, I’d like to hear more about what happened today: did you find images? Level up on a particular CSS skill? Decide something about your project? Raise a question in a new way that you’d like some help with?
Write me a quick email. Depending on time or interest, maybe a few people can say out loud new insights they think would help others.
Homework for next time
- By 11:59pm on Sunday, complete – at least for now – your website. Your repository (on GitHub or in a shared Box folder) should include:
- A multifile project folder (probably called “docs”), containing a combination of html and css files
- At least one more static screenshot (.png or .jpg) of your web pages in progress.
- Think about what moments are worth remembering as you go: where did you level up, or realize something, or get stuck?
- An updated README.md file, introducing the Website source code to a new audience.
- An updated ASSETS.md (or CREDITS.md) file reflecting what you actually used, including documentation of any outside sources and your permission to use them (e.g. explicit licenses like CC, or rationales for claiming fair use)
- If you want, this can be a live page (or a footer) on your website.
- An updated README.md file introducing your website to a new audience. Make it something to live beyond this assignment, if you can. :¬)
- By Tuesday’s class, write a prose reflection that incorporates images from your feedback and screenshots of your Atom project and the website itself. As explained in the prompt for the assignment, this should include:
- At least 500 words
- Your own assessment of how you met the baseline criteria and goals for the unit, as well as any aspirational criteria as appropriate
- At least one photograph of a notecard with feedback you used (and please say how)
- At least one or two screenshots of your work in progress (ideally, related to the discussion in the previous two bullets)
- Post your reflection to the course site’s Issue queue, to make it easier to embed images.
- If you want to then copy the source code into a file in your repo called reflections.md, I won’t stop you!
- If you feel strongly that you’d rather keep your reflection private, you can email it to me instead. But my default assumption is that we learn from each other as much as from ourselves, so I hope you can find a way to write publicly about your experience with this project.