GitHub and Git; Intro to Sound unit
Texts to have read/watched:
- Git and GitHub for Poets, starting at least with the Introduction
Work to have achieved:
- Download and install what you need to use Git on your own computer: probably the Desktop app, but optionally also at the command line
Plan for the day
- GitHub Episode 2: Clone Warriors
- Multiple views of the same files: web, command line, Finder/Explorer
- One more view: Atom interface
- Now it’s your turn! And also, here’s the first project assignment
- Audacity Tour, by way of a past-semester example (10-15 min)
- Why we need Git Beyond GitHub
- HW Preview
1. GitHub Episode 2: Clone Warriors
Last time, we saw how GitHub can let multiple people edit a file, integrate the changes, and keep track of the file’s history. So far, so good!
But that was all text files. What happens when you want to work on something the web interface can’t handle, like sound or images?
As it turns out, most of the time, you’re going to want to have a local copy of your project that you can pull down from the clouds, make your changes on your own machine, and then push back up with the changes and history intact.
In git-speak, that linked local copy is called a clone. There are some good instructions (including pictures) in the GitHub documentation: https://help.github.com/articles/cloning-a-repository.
Allow me to demonstrate by cloning the Digital Affordances repo from last class.
2. Multiple views of the same files: web, command line, Finder/Explorer
When you clone a repository, it shows up on your computer as a folder, because that’s all a repository is: it’s a file folder. You can open it in Finder (Mac) or Explorer (Windows), and everything’s arranged just the way you’d expect.
You can also open it via command line (a.k.a. Terminal on Mac, or GitBash or PowerShell on Windows), and it’s all just a different vantage point on the same location.
For more on the command line, click here to expand.
The command line: behind the scenes
See also the "Git and GitHub for Poets" episode 1.5, intro to the command line. Much as a repository is just another name for a file folder you're tracking, the command line is just another way of seeing the files you're used to seeing in windows. (Note the lowercase 'w.') Instead of a graphical interface, everything here will be text. If you're not sure how to open a command line, try these instructions.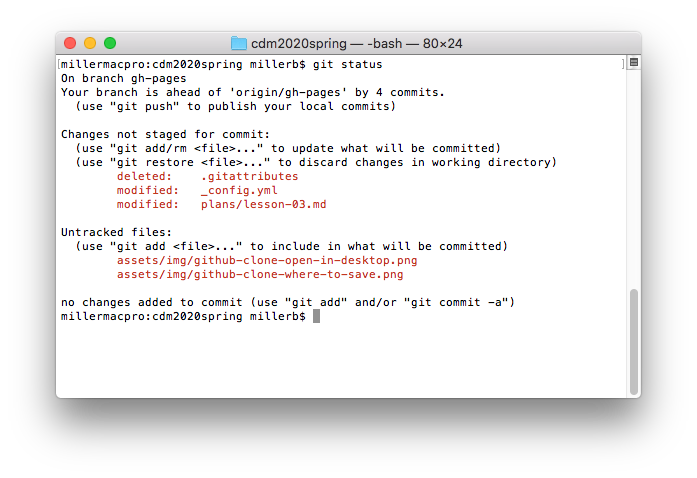
git status yields information about the repository's state (what's new, modified, or deleted since the last commit) and gives tips about how to proceed (last line before the return of the prompt).
To get where you're going:
cd path/to/your/folder    # change directory
pwd               # print working directory (i.e. where am I?)
ls                # list directory contents
cd ..             # go up one directory level
cd ~              # go to home folder
open .            # open the current directory in Finder/Explorer
cd (note the space) and just drag-and-drop the folder from Finder/Explorer into the command line.
NB: You can also press tab to autocomplete a partial file or folder name.
Basic git workflow:
git status           # see what git is tracking / what's changed
git pull             # download changes from GitHub
git status           # start of loop
# here you make changes to your files
git add %filename%   # optionally repeat
git status
git commit -m "your headline commit message - note the quotes" -m "your optional extra details, if you want them, just go in a second message."
                     # repeat add/commit loop as desired
git push             # publish your changes
Which brings us to…
3. One more view: the Atom interface
Initial questions to ask:
- How is the space of the app laid out?
- What’s given the most prominent visual focus?
- What features/tools do you have quick access to?
- for example: what do you get in the right-click menu?
Suppose I would like to reorganize these files. Here’s how I would…
- create a subfolder
- move files into the folder
4. Now it’s your turn! And also, here’s the first project assignment
Before we get too into the details, I want you to practice what I was just demoing:
(3) Open the repository in Atom. (4) Change the name of the README.md file to assignment.md (5) Create a new file in the repository, called README.md, and (6) Fill it with some placeholder content, like, “This is the future site of so-and-so’s soundscape narrative.”
With that done, let’s read through the assignment!
As I explained in the syllabus, your first project is to arrange layers of sound to convey a sense of place and story. In assigning this, I have two main goals for you:
- to learn how to capture sound and edit it using digital tools, and
- to explore the affordances of sound as a medium,
with particular attention to its ability to communicate
- immersive environment and
- narrative pacing and change.
5. Audacity Tour, by way of a past-semester example (10-15 min)
I want to start with a behind-the-scenes view of one of the finished soundscapes I’ll ask you to listen to for homework.
This is Tyller Barner’s “Coffeeshop Conversations,” from Spring 2019. I’m very happy to talk at some point about the piece itself, but for now, let’s see what it can show us about this new application, Audacity.
Initial questions to ask:
- How is the space of the app laid out?
- What’s given the most prominent visual focus?
- What features/tools do you have quick access to?
Now let’s play
Project files vs. rendered files
Important: Audacity project files, with extension .aup, do not in themselves contain any sound. They are, instead, an index of the files that live in an adjacent folder: if your main file is project.aup, then the data folder is project_data.
The .aup file and the _data folder must always live in the same containing folder, and move together. If you have one in your repository but not the other, the project will not open properly!
NB: You should never need to manipulate the files in the _data folder directly: just let Audacity handle them.
6. Why we need Git Beyond GitHub (10 min)
The number of files in the _data folder can get quite large – easily into the hundreds. And the GitHub web interface, as great as it is, cannot handle that many files at once. Trying might well break your project.
So we’ll need another solution.
Luckily, we have one! As you’ll have learned from the videos, GitHub as a (mostly web-based) file-sharing and project-management platform is built on top of another system – Git – which runs mostly on text commands.
And Git can handle quite a bit more than GitHub can… and then share it seamlessly to GitHub, with all the hard work taken care of.
In particular:
- Git lets you "stage" multiple files at once and wrap them in a single commit.
- Git lets you keep track of changes locally (on your own computer) before you're ready to share them with the world – and then to "push" multiple commits all at once.
- If you use the command line, you can also access and activate more features of Git than the GitHub defaults allow.
Yet another view
If you’ve downloaded GitHub Desktop, you can use a visual interface to accomplish all of those local commands. And it’ll also generously prompt you to push changes when you’ve finished committing them.

git add; uncheck to unstage individual files, as they'll all be selected by default. Commit messages are entered at the bottom left. A button to push is part of the toolbar at the top right.
You should now be able to (7) Commit the changes you made above: a new name for the old README.md file, and a new README.md with your own content. Then go ahead and (8) push back to GitHub.
NB: This is also how I'll confirm attendance for asynchronous participation.
HW for next time:
- Download the Audacity audio editor, or update to the latest version if you already have it.
- NB: some source sites will try to trick you into downloading unrelated software. Don’t fall for it. Start on the audacityteam.org, and read the links carefully.
- Optionally also download the separate FFmpeg import/export library, which expands the file types Audacity can handle.
- Bring headphones – we should have time to practice using it!
- Watch some orienting videos from LinkedIn Learning:
- Selecting and Zooming (6 min)
- Playback Controls (4 min)
- Make Selections (5 min)
- Listen to the following recordings made by students in response to a similar prompt:
- Barner, Tyller. “Coffee Shop Conversations.” Digital Media and Pedagogy Showcase Spring 2019. http://dmap.pitt.edu/node/248.
- Funke, Taylor. “Soundscape - Day In: Day Out.” Digital Media and Pedagogy Showcase Spring 2018. http://dmap.pitt.edu/node/177.
- Quaid, Fatema. “A Haunted Halt.” Digital Media and Pedagogy Showcase Fall 2019. http://dmap.pitt.edu/node/295.
- Wick, Thomas. “Soundscape - Expedition to Planets Unknown.” Digital Media and Pedagogy Showcase Spring 2018. http://dmap.pitt.edu/node/178. (NB: starts loud; turn volume down)
- Write a short blog post to the appropriate thread on the issue queue: What do you notice, i.e. what stands out while reading or listening? What does that suggest, or what does it make you wonder?
- Optional: This will be part of the homework for next week, but if you want to get a head start, read the following advice on sound recording, listening to the embedded clips:
- Fowkes, Stuart. “The Top 5 Things You Need to Make a Great Field Recording.” Cities & Memory: Field Recordings, Sound Map, Sound Art, 13 Aug. 2014, https://citiesandmemory.com/2014/08/top-5-things-need-make-great-field-recording/.
- MacAdam, Alison. “6 NPR Stories That Breathe Life into Neighborhood Scenes.” NPR Training, 30 Oct. 2015, https://training.npr.org/audio/six-npr-stories-that-breathe-life-into-neighborhood-scenes/. (Note the time skips she recommends: sometimes a long clip is embedded, but not meant to be listened to in full.)