Web Unit Studio / Deployment
Work to have done (by Tuesday, but with catch-up as needed):
- As much of the Interneting is Hard (but at least it’s WebArchive crawled) tutorial as you can – at least parts 1-6 (from “Introduction” through “CSS Selectors”)
- More on CSS selectors: the CSS Diner game and/or a CSS-Tricks roundup
- A website proposal, posted to the Issue Queue
Plan for the day:
- Brief intro to GitHub Pages
- Reminder of needful things from last time
- Set goals and go forth!
- Update your goals
- HW: first preview due Tuesday
0. Warm-up conversation
What did you guys think of the CSS Diner?
1. Brief intro to GitHub Pages
What it is
In addition to the wonderful things we’ve already used GitHub for, like forking, cloud storage, and peer comments on commits, GH also lets you make a fully functional basic website – open to the public and everything – for free. They call it GitHub Pages.
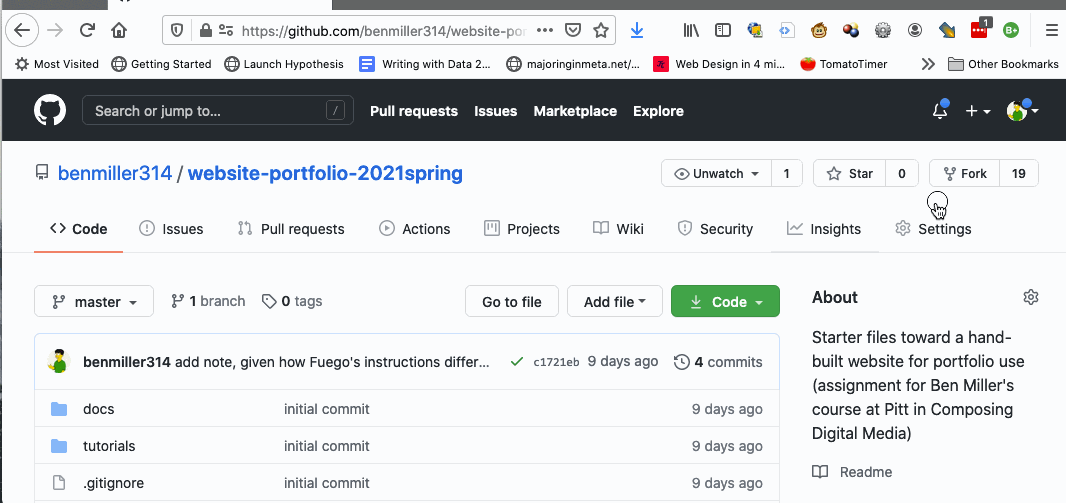
Here’s how it works: you store your files in a GitHub repository (in a branch called “gh-pages,” like I do for this site, or a subdirectory called “docs” – look in your own repos!), and GH knows where to find your stuff.
How to do it
To activate GH Pages,
- Go to your repository Settings
- Scroll down to where it says “GitHub Pages”
- Change the source from “none” to “master”
- Change the folder from “/ (root)” to “/docs”
- Click “save.”
And that’s it! The settings should now show you the URL where your rendered HTML will appear. If it doesn’t, just wait and/or try again; sometimes it takes a minute or two to refresh.
 .
.Tips and tricks
Therefore, rather than call your landing page myproject.html, landing.html, or home.html, you’re better off if you name your homepage index.html. You can always change the <title> to give it a more accurate name in the browser tab. : )
In addition, you should be aware that GH Pages takes a little time to render your latest changes. For faster feedback on the changes you make, you’ll want to view the local file in your browser, rather than always waiting for the live site to load.
Finally, if you’re feeling confident about code and want to make it less repetitive, GH Pages comes with the Jekyll templating engine built in. Setup for local development with Jekyll is a little more involved (it requires the command line and Ruby), but the documentation is pretty good. You can read more about it, and find a series of relevant links, on our Resources page, at the end of the section on Web Frameworks.
In conclusion
2. Reminder of needful things from last time
- Beware of scope creep; plan for phased releases.
- Start by thinking about structure (i.e. HTML before CSS).
- You don’t have to reinvent the wheel.
- When you’re ready to work on appearances, test CSS rules directly in the browser.
- Be sure to copy your changes to your text editor for safe keeping (i.e. Atom, by default), or they’ll disappear when you refresh!
- To make copy/paste easier, click on the source your browser created for your new rules: in Firefox it’s called “inline”, in Chrome “inspector-stylesheet”, in Safari “Inspector Stylesheet.”
If you want a refresher on what any of those things mean, you can find more detail in Tuesday’s lesson plan. I also had these pieces of general advice:
- Strive for semanticity.
- Let appearances reflect the structure, not vice-versa.
- If you’re stuck for what to do, CSS-wise, start with some basic spacing.
- Web Design in 4 Minutes suggests what some of those basics might be.
- For more advanced layout (sidebars, columns, grids, etc), see the links in the homework assignment.
3. Go forth!
In the shared google doc, set a goal for today: what do you need to do to level up on HTML, CSS, and resource gathering to move toward your specific project? Note that a Website Preview is due on Tuesday, but the Website Draft isn’t due until a full week after that. (I’m suggesting that you work on getting some content into HTML by Tuesday, and a starter layout into place by Thursday, April 1st.)
Save about five minutes at the end to write me a brief exit note about what you’ve been working on.
4. Exit note
Homework for next time
- Do more of the tutorial, including at least Flexbox (8) and Responsive Design (10), if you haven’t yet. (Broken record reminder: you can skip Floats.)
- As a reminder, you should write out the exercises in the tutorials and push them to your repository – probably in the tutorials subfolder. That helps me know where I can be more helpful, especially if things are starting to go sideways.
- Once you have the tutorial sample code working as presented, by all means update the pages to test out ideas for your own site! But do try to confirm you can get them working first. HTML, like all code, is fiddly: punctuation (including spaces) matters for things like close-tags and CSS selectors.
- It might help to keep the tutorial files as written in the tutorials subfolder of your repo, and then save the duplicated-and-modified versions in your docs folder.
- Separately, also read about Grid Layout (and optionally the followup post on responsive grid).
- If you want to practice with this code, go for it! Just create a new folder in your tutorials subfolder.
- EXT: Want more CSS Grid templates and examples, including CodePens to play with? Try Grid By Example, which also has video tutorials (in a charming British accent, if you find that sort of thing charming).
- Compose and push a first website preview: a beginning, focused on content and navigation.