Digital Affordances
Texts to have “read”:
- Tyler Su’s “Playing Lev Manovich”
- Sample sound narratives
Writing to turn in:
- A post to the main course issue queue, reflecting on what you noticed and wondered in your reading/playing/listening
Plan for the day
- What’s different about digital again?
- Continuing where we left off: clone and edit, push and pull
- Audio unit assignment
- Homework preview
1. What’s different about digital, again?
Can I get five people to recap the five “principles of new media” from the webtext I asked you to read? i.e. One person, one term.
Let’s take notes here: bit.ly/cdm2022spring-notes. Any volunteers to be in charge of notes for today? Usually 2-3 people works best…
What do these framing concepts help you see about “digital” that wasn’t part of the story you told in your group last class?
I had you pair this reading with listening to several audio narratives. What does putting these things together help you notice or better understand – about either the audio narratives or about the concepts?
2. Return of the GitHub: clone and edit, push and pull
Last time, we saw how GitHub can let multiple people edit a file, integrate the changes, and keep track of the file’s history using the GH website. But what if you want to change multiple files at once? What if you want to track history for files that aren’t text, and can’t be edited directly on their website?
As it turns out, most of the time, you’re going to want to have a local copy of your project that you can pull down from the clouds, make your changes on your own machine, and then push back up with the changes and history intact.
In git-speak, that linked local copy is called a clone. There are some good instructions (including pictures) in the GitHub documentation: https://help.github.com/articles/cloning-a-repository.
2a. Clone
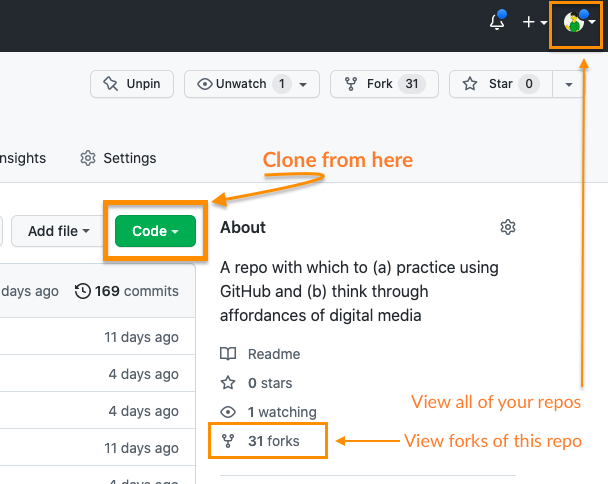
Let’s practice by cloning the CDM GH Practice repo from last class – your own fork of that project, so you’re able to submit changes to it. (If you’ve lost your fork, you can find it again by clicking on either your profile or on the number of forks in the description block. The latter will show you all the forks of the project you’re viewing, and the former will show you all the repositories you’re a member of.)
When given the option, choose “Open in GitHub Desktop.”
2b. The GitHub Desktop interface
I zoomed through this too quickly last time:
- How is the space laid out?
- What can you see? What can’t you see that you expected to, if anything?
- What’s given the most prominent visual focus? Secondary focus?
- What features/tools do you have quick access to?
- For instance, what’s featured in the menu? What about the context menus (e.g. when you right-click)?
- Do any of those tools let you find what you were missing?
2c. The Atom Interface
Let’s take advantage of one of those featured options to open the repository in your preferred text editor.
And then let’s ask those same questions again:
- How is the space laid out?
- What can you see? What can’t you see that you expected to, if anything?
- What’s given the most prominent visual focus? Secondary focus?
- What features/tools do you have quick access to?
- For instance, what’s featured in the menu? What about the context menus (e.g. when you right-click)?
- Do any of those tools let you find what you were missing?
Let’s practice:
- adding a new file
- changing a filename
- splitting the screen to show two files at once
Go ahead and make a change to your story from last time, and save it. (Not sure what to add? Maybe incorporate an example of modularity, automation, variability, or transcoding.)
Where does the change happen? Who can see your changes?
2d. Back in GH Desktop…
Write a commit message in the bottom left. (Make sure it’s meaningful.) Before you click “commit,” make sure you’ve selected the files you want to include under this version.
GH Desktop FAQ
What if I realize I made a mistake in my last commit?
Go to the History tab, and right-click the last change (which will be on the top). You have options!What if I already pushed my mistake to the cloud?
That's trickier. Here, to undo, you're probably going to need to add. While there are ways to "alter history," they're a little riskier than just reverting. Instead, you'll need to "revert" the change, which results in a new commit. (In GH Desktop, you can again find this in the right-click menu of the History tab.)If I revert an old save, why don't I go back to that point in time?
Remember that each commit is a record of the **difference** between two states. So by reverting that difference, you're undoing that particular change. (This can be beneficial!)So what do I do if I actually want to roll back all the way to a particular old commit?
The easiest option is to right-click that point in the History, then choose "create branch from this commit." You'll find yourself in a workspace identical to that point in time... but without destroying the work you've done since.I tried that branch thing. You said it wouldn't destroy anything, so where are all my files?!?
When you "check out" a branch, the only files you can see are the ones on that branch. The others get hidden away inside the .git folder (which I strongly urge you not to open). If you were to switch back to the branch from before, you'd be back in that timeline, and the files would change accordingly. To merge branches back together, you just need to file a pull request and actively commit to the merge. In GH Desktop, you'll find both options (switch and pull request) under the "Branch" menu.3. Another repo to fork and clone: the Audio Narrative assignment
3a. First, let’s read!
As I explained in the syllabus, your first project is to arrange layers of sound to convey a sense of place and story. In assigning this, I have two main goals for you:
- to learn how to capture sound and edit it using digital tools, and
- to explore the affordances of sound as a medium, with particular attention to its ability to communicate
- immersive environment and
- narrative pacing and change.
The README file has additional constraints, which I hope are generative; deadlines to give a rhythm to your production, review, and revision; and some “parachute prompts” if you feel lacking in direction and a deadline’s coming up.
3b. Then, let’s practice that edit / commit / push cycle!
(3) Open the repository in Atom. (4) Change the name of the README.md file to assignment.md (5) Create a new file in the repository, called README.md, and (6) Fill it with some placeholder content, like, “This is the future site of So-and-So’s audio narrative.” You can (and should!) update this later.
Save your changes, and we can head back to GitHub Desktop. Note that, unlike github.com, GH Desktop…
- lets you "stage" multiple files at once and wrap them in a single commit.
- lets you keep track of changes locally (on your own computer) before you're ready to share them with the world – and then to "push" multiple commits all at once.
- makes it easier to undo or amend the most recent commit
NB: If you use the command line, you can also access and activate even more features of Git than graphical interfaces allow. I’m going to drop this here, in case anyone finds they need it: https://ohshitgit.com/ (or the more kid-friendly https://dangitgit.com/).
If you haven't yet done so, please... (7) Commit the changes you made above: a new name for the old README.md file, and a new README.md with your own content. Then go ahead and (8) push back to GitHub.
NB: This is how I'll expect you to turn in all major assignments and meet interim deadlines toward them. It's also how I'll confirm attendance for asynchronous participation in today's class.
HW for next time:
- Download the Audacity 3 audio editor, or update to the latest version if you already have it.
- NB: some source sites will try to trick you into downloading unrelated software. Don’t fall for it. Start on the audacityteam.org, and read the links carefully.
- Optionally also download the separate FFmpeg import/export library, which expands the file types Audacity can handle. Might be useful for imports from your phone, depending on your device!
- Optionally download a phone recording app. Your device may already have a decent default voice recorder that you can use; let the class know if you have suggestions (or anti-suggestions).
- Watch this recommended Audacity 3 tutorial (about 20 minutes long) and come in ready to play with the software (and ask any questions that come up)
Optional: This will be part of the homework for next week, but there’s a bunch of stuff over the weekend. If you want to get a head start:
-
The term “asset” comes from the book Writer/Designer (Ball, Sheppard, and Arola, eds). A scan of the relevant chapter is posted to the Perusall social annotation software on Canvas; I’ll ask you to read it before writing your proposal.
-
I’ll also ask you to read the following advice on sound recording, listening to the embedded clips:
-
Fowkes, Stuart. “The Top 5 Things You Need to Make a Great Field Recording.” Cities & Memory: Field Recordings, Sound Map, Sound Art, 13 Aug. 2014, https://citiesandmemory.com/2014/08/top-5-things-need-make-great-field-recording/.
-
MacAdam, Alison. “6 NPR Stories That Breathe Life into Neighborhood Scenes.” NPR Training, 30 Oct. 2015, https://training.npr.org/audio/six-npr-stories-that-breathe-life-into-neighborhood-scenes/. (Note the time skips she recommends: sometimes a long clip is embedded, but not meant to be listened to in full.)
-